Introduction
Interiors are typically where a component car shows its origins as a non-production car. Fortunately, the SL-C has a pretty refined interior for a component car, capable of rivaling the best production cars, given attention to fit and materials. An SL-C with a great interior can add thousands to the value of the car, and if it is important to you, can greatly increase the enjoyment of the car, as the interior is what you see whenever you are driving the car. It's also the interface for everything you touch, so careful attention to design and material selection is critical to achieving a really great interior.
Interior Options
The car has essentially two kinds of interior options for finished cars: either the original fiberglass panels, or the new integrated "tub" option.
A race or track car probably only needs the dash, and in some cases, even that is replaced with a simple aluminum panel.
The kit comes with the dash; all other panels are optional.
Original Interior Pieces
The original car's interior was actually styled by a contracted design company in Detroit that was formerly a captive interior design organization for one of the big three automakers. Superlite asked them to come up with a great interior using fiberglass panels to give the builder a strong foundation to build upon. The result was a set of panels that included:
| Panel | Comment |
| Dash | Common to both the original panels and "tub" option, the dash features two main binnacles; the left one contains the instrument cluster, and the right one can be used for gauges and switches, or a tablet or similar display. There is no room for a conventional 2-DIN radio or similar size unit as there is only about 2" of depth behind the center binnacle. However, the Alpine iLX-007 is a shallow 2-DIN radio that some builders have measured and assert will fit. It is an Apple-focused receiver, so bring your iPhone. |
| Roof panel | This panel slots into the bulkhead and provides a finished roof. Many builders upholster this in Alcantara or similar material. It could also be flocked or covered in vinyl, or (gasp) headliner material. Some builders have installed rear view camera screens, switches, Homelink systems etc. here as well. |
| Door panels | The stock doors have an inset where a custom panel can be fabricated and installed; this is usually where the door handles are installed. Alternatively, the door panels described here allow that area to be covered, along with an area extending up to the rear of the doors, as well as adding a new area for door handles (there is a recess in these panels for the stock door handle). These are attractive panels, and can be used with either the original panels or the new "tub". |
| Under door panels | These panels fit under the door openings and seal up the door opening to the rest of the body. Not necessary with the tub option, but should always be used with the original panel set. |
| Bulkhead panel | This panel fits behind the driver and passenger head area, and covers the engine bulkhead. A variant of it is already part of the "tub" kit so isn't needed if you selected the tub option. It really is a great panel for sealing the engine bulkhead area, though, and it also closes out the roll bar hoop. |
| Console | The original console is a little wider than the one supplied in the "tub" option, and styled differently as well. |
| Kick panels | Not needed with the tub option (as the tub already contains material that covers much of this area), these panels fit under the dash, and extend the under door panels, as well as cover the vertical 2X6 under the dash. |
| A-pillars | These fit on top of the dash, and extend to the roof panel, covering the forward roll hoop, and providing a finished look to the interior. These are a good addition to both the original and tub options. |
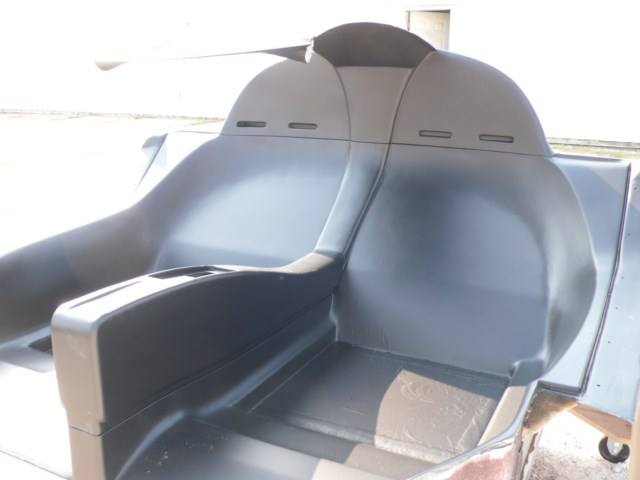
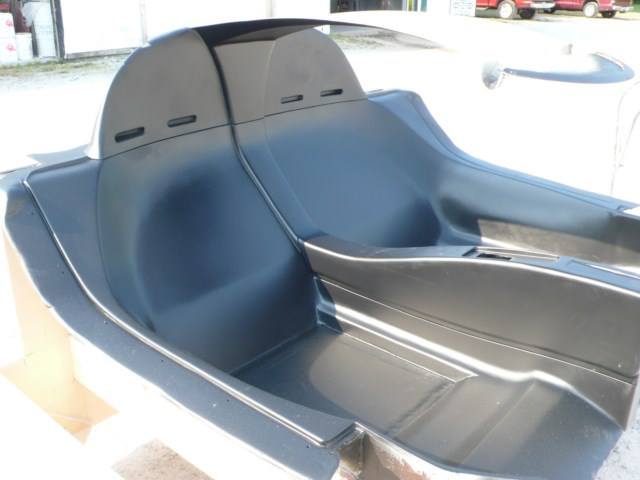
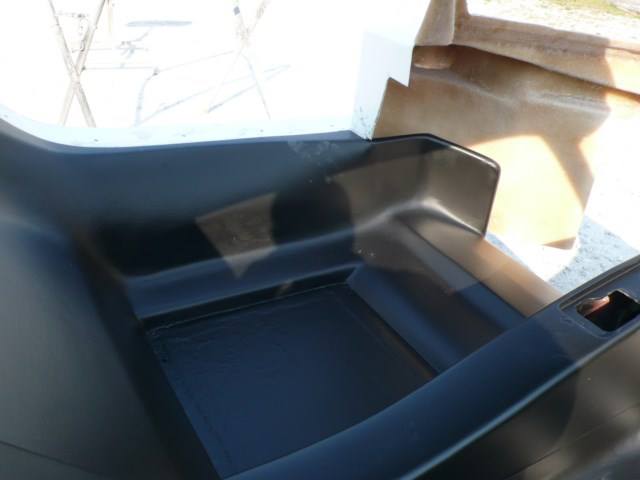
New "Tub" Option
Superlite has an optional interior "tub" kit available for the SL-C. This kit replaces all of the original fiberglass interior pieces (except for the dash, A-pillar covers, and optional door panels) and has the further advantage of self-aligning the body the the chassis. Unlike the original interior panels, the tub molds were created in-house, just like the original body molds.
The tub also covers the fuel tank area with a nicely molded integrated cover- this area is open in the original versions, and so needs additional work for those cars with the original panels. At least one builder using the original panels has had a particularly nice fuel tank cover, shown in this thread, starting at post 838.

The tub is installed at the factory, and then the body is dropped on. If you elect to upholster the tub, you will need to remove it from the car, which necessitates removal of the body. The implication of this is that when wiring, plumbing, sealing, or similar work is performed on the car, it should be done with the understanding that the body will need to be removed to upholster the interior. That means, for example, that any wires crossing into the body need to have connectors so they can be easily disconnected when the body is removed. Of course, the same holds true for anything attached to the tub or its parts, like switches, etc.
Like many of the original fiberglass panels, the tub can be ordered in fiberglass or carbon fiber. If you order a carbon tub, the price is much more, but your upholstery costs may be reduced by more than the incremental cost of carbon over fiberglass, so think about that when you order; it may actually be cheaper in the end to order the carbon version, if that's the look you want.
In summary, assuming you want to use the factory panels for your interior, you need to order either the "tub" option, or the combination of the original interior panels.
In either case, you will still need to order the A-pillar covers and the optional door panels, as these aren't included in the "tub" option.
Materials
The interior can be finished with a wide variety of materials. Some cars have used vinyl, leather, suede, Alcantara (a brand name of a synthetic suede or microfiber), flocking, headliner material and other materials to cover interior panels and surfaces.
In addition to fabric and leather, several builders have used soft-touch paint, especially on the dash and console, to good effect. This special paint typically has a matte finish, and a very soft, almost velvet or soft rubber-like "hand" (an upholstery term which describes the feeling of a surface when a hand is rubbed across it, typically soft, hard, rough, etc., depending on the material). Modern versions of this paint are still fragile compared to some other options, but carefully applied and cared for, can be a low-cost and attractive alternative to other materials. It can be purchased at Alsa Corp.
If you elect to use Alcantara, be sure to use the auto upholstery version, not the furniture-grade product, as only the auto version is designed for the special requirements of a car interior. Check with your supplier if you aren't sure.
Modern upholstery shops have a dizzying array of carpets from which to select, but be careful to be sure you install or have them installed with the proper backing, as the backing can not only soften the look and provide a better feel, but also allow the carpet to wear better. It's also a good idea to have exposed carpet edges serged or bound. Carpet bindings can be anything, from vinyl to leather to Alcantara- choose this to match or accent your interior design.
A-Pillar Covers
These are optional fiberglass pieces that cover the sides of the front roll hoop to provide a more finished look to the interior- leaving the roll hoop exposed doesn't look very OEM, but it can add to the raw, racer look if that is what you want. Builders trying to get the exotic supercar look will want to use the A-pillar covers, or something similar of their own manufacture.
The factory pieces generally need work to fit correctly. The first step is to "behead" them. By that we mean that the part that fits to the roof panel should be cut off, and fiberglass and body plastic (e.g., Bondo) used to mate the end to the roof panel. A butt joint is typical in a well-finished interior.
The second part is to fit the curve of the pillar cover to the actual shape of the body, carefully following the roll hoop. This takes time and patience, but is well worth it in the long run.
When trimming the pillar cover, be aware of how the leading edge fits at the windshield. It's common to find that the cover extends farther than the printed dot pattern on the windshield. To resolve that, use windshield primer to paint the windshield so that the back of the cover isn't visible when looking in from the outside.
Finally, in order to fit the covers optimally where they interface with the dash, careful attention to trimming both the dash and the A-pillar covers is important. Most people realize that the dash has to be trimmed to be able to slide into place along side the front roll hoop. Some cars have had this trimming done at the factory. In any case, the important thing to remember is that if you leave the bottom on the A-pillar, you need to make it fit like the piece you removed from the dash to fit over the roll hoop. If you decide to leave cut the bottom off the A-pillar, consider exactly how it will mate to the dash, and how that will look in terms of seams in the covering material or paint treatment.
Mounting the pillars can be as simple as using a piece of trim along their edge, with a small screw or two on the leading edge that are hidden from view.